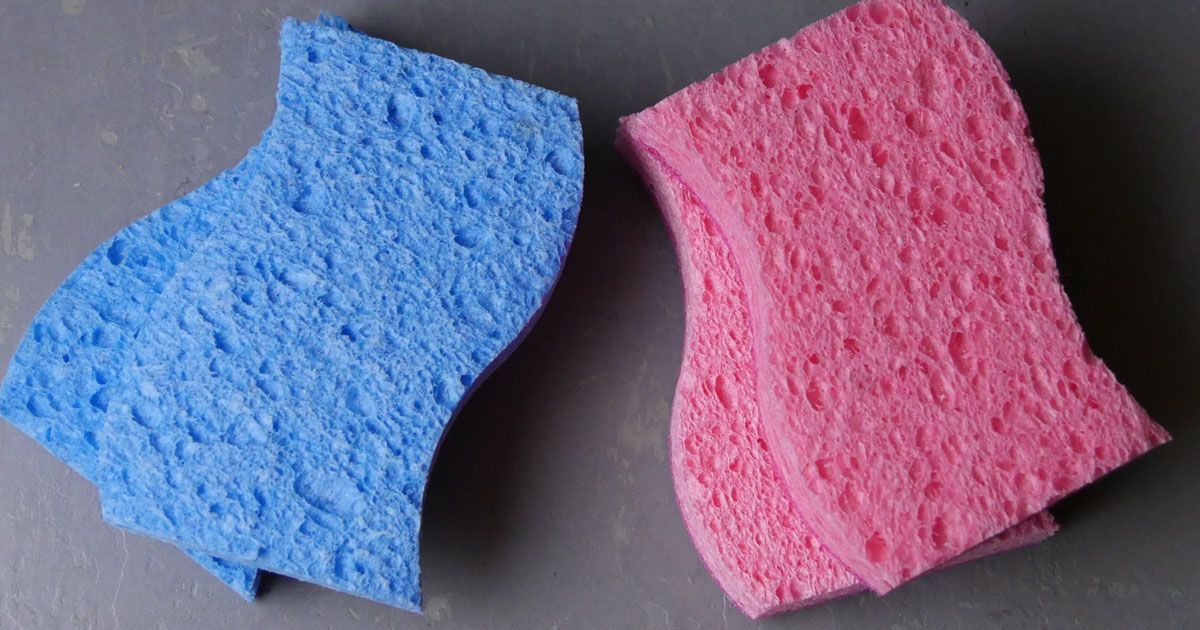
Sponges are one of those essential household items that need to be replaced frequently. Their everyday use and ability to absorb and hold moisture means it doesn’t take long for an effective sponge to go bad. Fortunately, a standard pack of new sponges isn’t something that’s bound to break the bank, making it easy to purchase them in bulk. Instead of storing the extras away for another day, consider a more creative approach.
If you have an extra sponge or two lying around waiting to be used, there are several tricks to turning this item into something even more useful around the home. From tending to the dust on the curtains or creating fun, kid-friendly toys, sponges are a budget-friendly and versatile product that you can quickly transform into something entirely new. When there’s a sponge handy, there’s no reason to head to the store for items like nail polish remover or even a bottle cleaning wand. Taking a little time to repurpose a sponge will save you both money and stress. Here are a few ideas to take sponge transformations to the next level of efficiency.
Advertisement
Create a sponge duster perfect for tackling blinds
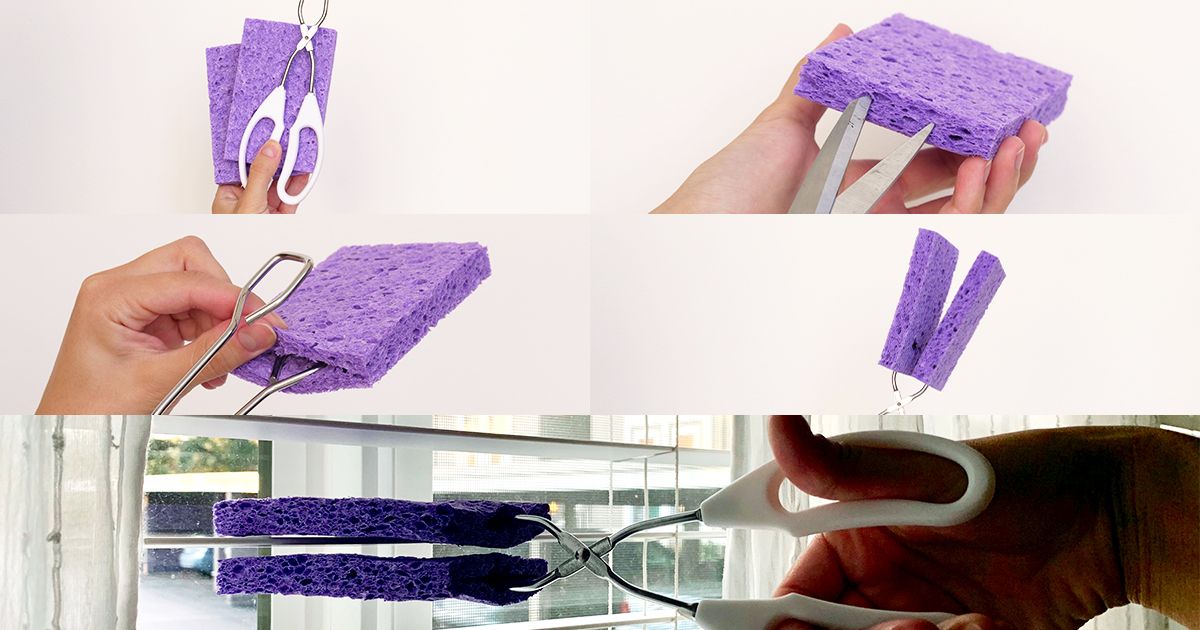
Dusting is one of those necessary tasks that doesn’t generally inspire enthusiasm. Those tough-to-reach areas like the tops and bottoms of curtain blinds can be frustrating and seemingly impossible to really get clean. For tackling these tricky places, consider turning a sponge into a DIY duster with the help of a pair of tongs. Cut a hole in the side of two sponges using scissors and slide each of the tong ends directly into the sponge. When the tongs are clamped together, the sponges act as a two-sided duster that’s perfectly suited for running across the length of each individual blind slate.
Dusting is one of those necessary tasks that doesn’t generally inspire enthusiasm. Those tough-to-reach areas like the tops and bottoms of curtain blinds can be frustrating and seemingly impossible to really get clean. For tackling these tricky places, consider turning a sponge into a DIY duster with the help of a pair of tongs. Cut a hole in the side of two sponges using scissors and slide each of the tong ends directly into the sponge. When the tongs are clamped together, the sponges act as a two-sided duster that’s perfectly suited for running across the length of each individual blind slate.
Cooktop Cove
Design a cleaning wand with a sponge for jars and bottles
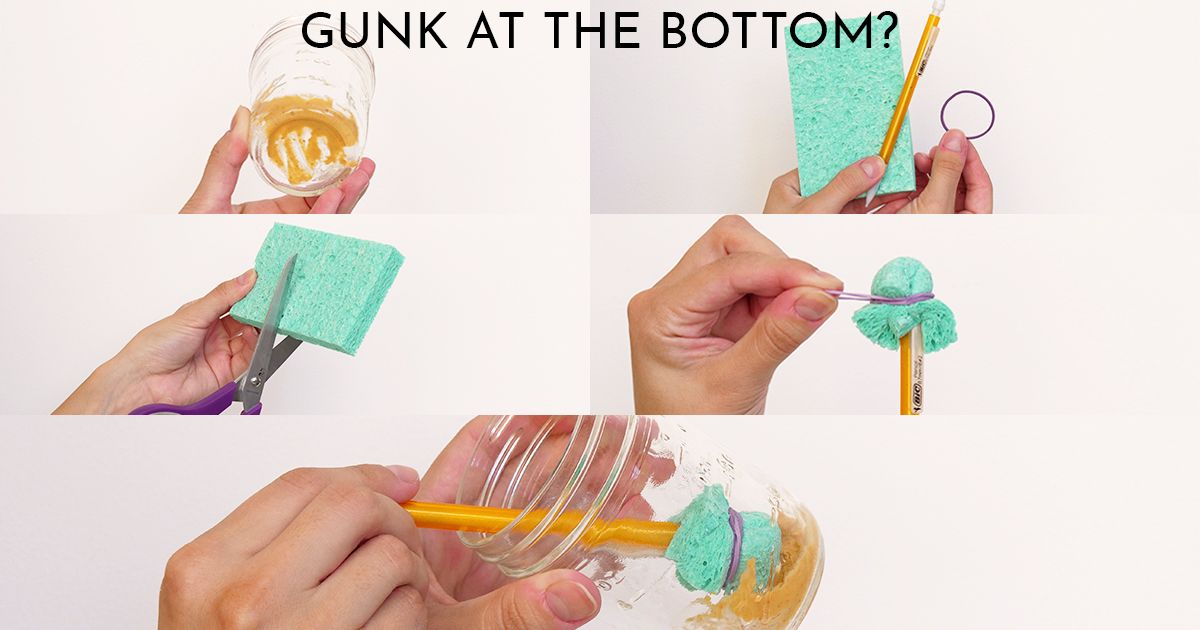
Whether it’s that last bit of peanut butter in the jar or formula that’s inconveniently clumped at the bottom of a baby bottle, it can be tough for you to find just the right way to get these containers clean. Keep hygiene top of mind without having to spend money on specialized cleaning wands by creating a DIY version using a sponge. Cut a sponge in half or into quarters, depending on the area you intend to clean. Rubber-band the small piece of sponge around the top of a pencil or chopstick, and see how easy it is to reach those difficult jar or bottle interior edges. After you're removed the gunk, take the sponge off the top of the pencil or chopstick and simply throw it out, knowing there are plenty of small sponge pieces ready to go for the next time cleaning is in order.
Whether it’s that last bit of peanut butter in the jar or formula that’s inconveniently clumped at the bottom of a baby bottle, it can be tough for you to find just the right way to get these containers clean. Keep hygiene top of mind without having to spend money on specialized cleaning wands by creating a DIY version using a sponge. Cut a sponge in half or into quarters, depending on the area you intend to clean. Rubber-band the small piece of sponge around the top of a pencil or chopstick, and see how easy it is to reach those difficult jar or bottle interior edges. After you're removed the gunk, take the sponge off the top of the pencil or chopstick and simply throw it out, knowing there are plenty of small sponge pieces ready to go for the next time cleaning is in order.
Cooktop Cove
Make reusable scented laundry sponges
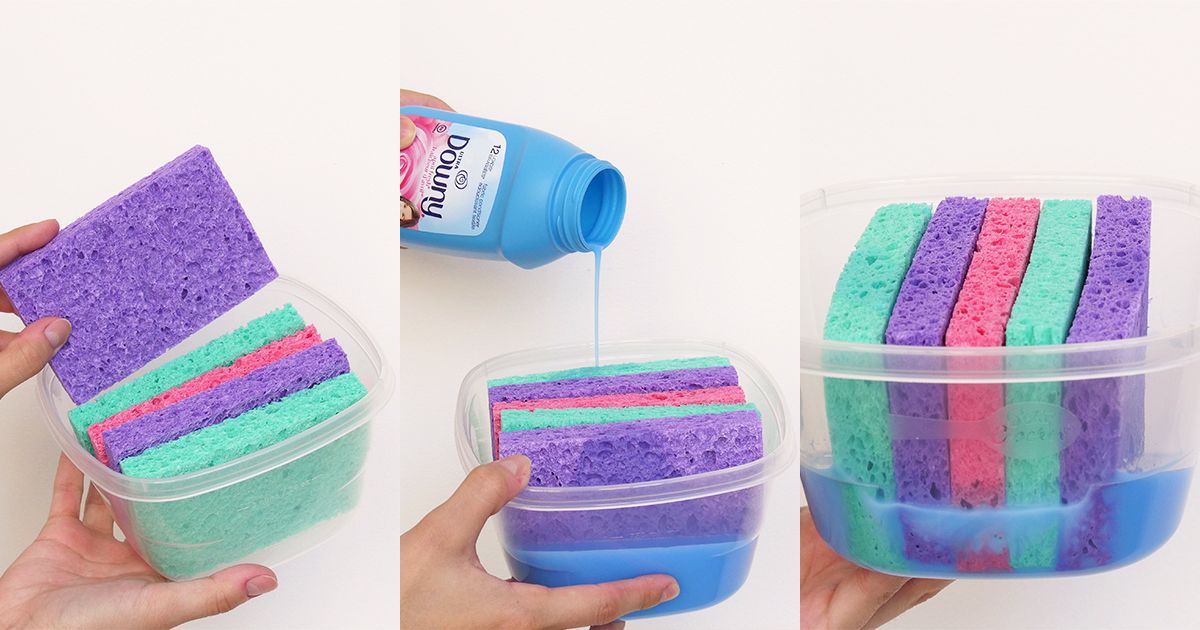
There’s something wonderful about taking clothes out of the dryer that are not only soft and clean but smell amazing too. When it comes to DIY fabric softeners, ditch the store-bought sheets and instead, replace them with sponges that can be used time and again. Fill a Tupperware container with equal parts water and fabric softener. Pack the container with a collection of new sponges and let the solution sit so the sponges can completely absorb the liquid. When it’s time to do laundry, throw a softener-soaked sponge in with the wet clothes and let it work away in time to the drying cycle. When the load is complete, simply replace the sponge into the solution for the next time.
There’s something wonderful about taking clothes out of the dryer that are not only soft and clean but smell amazing too. When it comes to DIY fabric softeners, ditch the store-bought sheets and instead, replace them with sponges that can be used time and again. Fill a Tupperware container with equal parts water and fabric softener. Pack the container with a collection of new sponges and let the solution sit so the sponges can completely absorb the liquid. When it’s time to do laundry, throw a softener-soaked sponge in with the wet clothes and let it work away in time to the drying cycle. When the load is complete, simply replace the sponge into the solution for the next time.
Cooktop Cove
Create DIY nail polish remover
It’s usually easy to see when it’s time for a new coat of nail polish, but removing the stuck-on color can be easier said than done. Instead of heading out and purchasing a pricey all-in-one finger-dip remover or wasting plenty of paper towels, take some time to create a polish remover at home using a set of sponges. Simply cut a sponge in half and curl the two halves around each other so they're tightly positioned inside a small mason jar. Pour generic nail polish remover into the jar before you insert the sponges, or pour it over the top of the sponges for quick absorption. Once the remover is fully absorbed, you can dip each finger between the sponges for easy color removal.
It’s usually easy to see when it’s time for a new coat of nail polish, but removing the stuck-on color can be easier said than done. Instead of heading out and purchasing a pricey all-in-one finger-dip remover or wasting plenty of paper towels, take some time to create a polish remover at home using a set of sponges. Simply cut a sponge in half and curl the two halves around each other so they're tightly positioned inside a small mason jar. Pour generic nail polish remover into the jar before you insert the sponges, or pour it over the top of the sponges for quick absorption. Once the remover is fully absorbed, you can dip each finger between the sponges for easy color removal.

Cooktop Cove
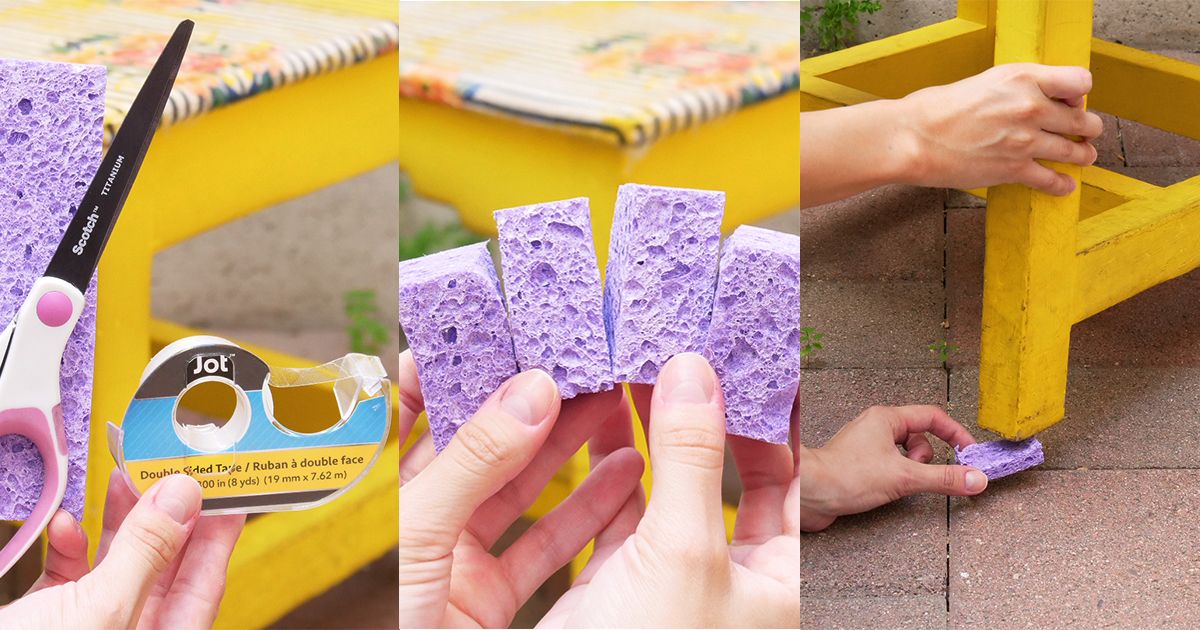
Protect surfaces from being scratched
Taking time to care for finished flooring can be a futile effort if they're destined to get scratched and scuffed every time a chair is pulled out or a table is repositioned. Leave the stress of witnessing new scratches behind by protecting delicate surfaces in your home with sponges instead. Cut a sponge into quarters and position each individual rectangle of material underneath chair and table legs. The minimal weight of the sponge means you can attach it with nothing more than a piece of Scotch tape. Cut the edges as needed so the sponge is invisible under the furniture leg, and feel free to move chairs and tables around at will.
Taking time to care for finished flooring can be a futile effort if they're destined to get scratched and scuffed every time a chair is pulled out or a table is repositioned. Leave the stress of witnessing new scratches behind by protecting delicate surfaces in your home with sponges instead. Cut a sponge into quarters and position each individual rectangle of material underneath chair and table legs. The minimal weight of the sponge means you can attach it with nothing more than a piece of Scotch tape. Cut the edges as needed so the sponge is invisible under the furniture leg, and feel free to move chairs and tables around at will.
Cooktop Cove
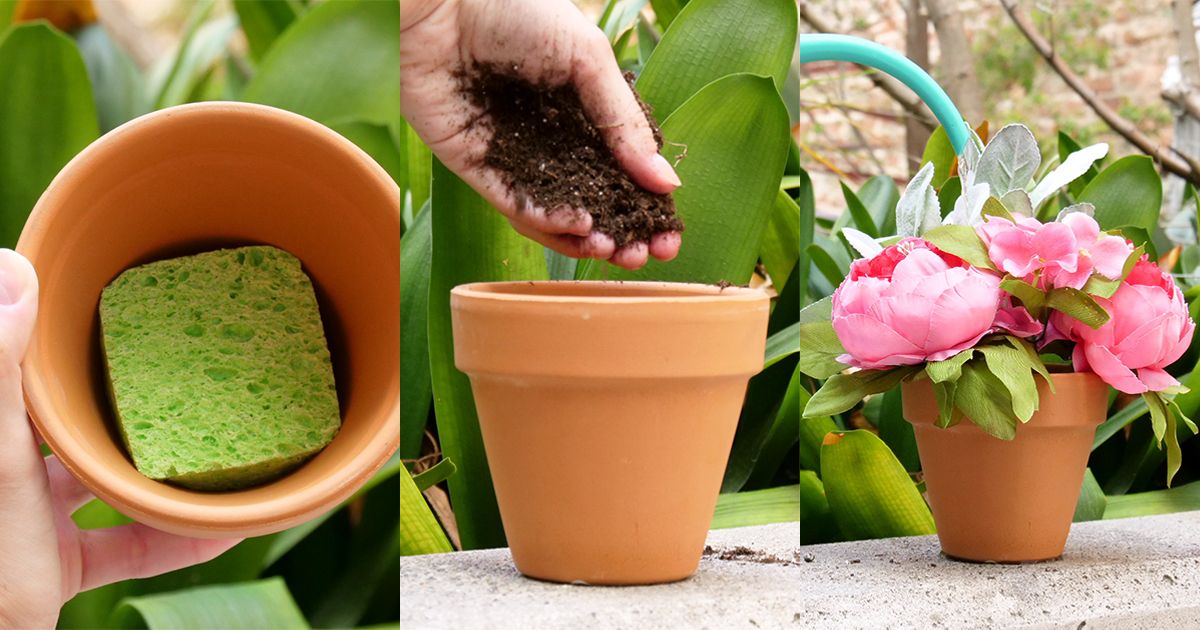
Place a sponge in the bottom of a planter for water control
The absorbent nature of a sponge makes it the ideal addition to the bottom of a planter. Cut the sponge to size and position it in the bottom of a growing pot before you add soil and the plant. The porous material will quickly soak up excess water while remaining damp, which assists with plant growth over time. A sponge in the bottom of a planter can also be beneficial for fake plants. Use the plant to keep the stems in position and pick a sponge color that reflects grass or ground for even more natural appeal indoors.
The absorbent nature of a sponge makes it the ideal addition to the bottom of a planter. Cut the sponge to size and position it in the bottom of a growing pot before you add soil and the plant. The porous material will quickly soak up excess water while remaining damp, which assists with plant growth over time. A sponge in the bottom of a planter can also be beneficial for fake plants. Use the plant to keep the stems in position and pick a sponge color that reflects grass or ground for even more natural appeal indoors.
Cooktop Cove
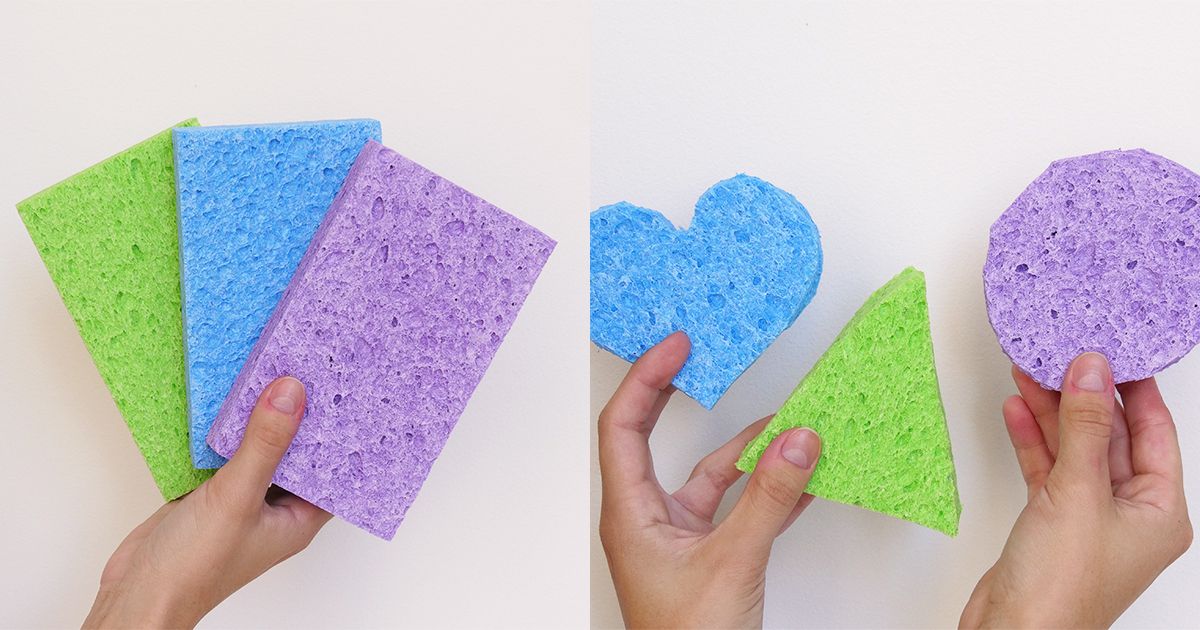
Design creative toys for kids with colorful sponges
An added bonus when you're purchasing sponges in bulk is the option to pick up a pack that comes in a variety of colors. Those with children who are constantly looking for new forms of entertainment will find that cutting these multicolored sponges into various shapes provides a quick and fun way to spend playtime at home. A collection of heart, circle and triangle sponge pieces is a wonderful way for children to safely learn colors and shapes during play. For older kids, try turning those same sponge shapes into stamps by dipping them into paint and letting children create one-of-a-kind artwork that’s ready for the refrigerator.
An added bonus when you're purchasing sponges in bulk is the option to pick up a pack that comes in a variety of colors. Those with children who are constantly looking for new forms of entertainment will find that cutting these multicolored sponges into various shapes provides a quick and fun way to spend playtime at home. A collection of heart, circle and triangle sponge pieces is a wonderful way for children to safely learn colors and shapes during play. For older kids, try turning those same sponge shapes into stamps by dipping them into paint and letting children create one-of-a-kind artwork that’s ready for the refrigerator.
Advertisement
Cooktop Cove