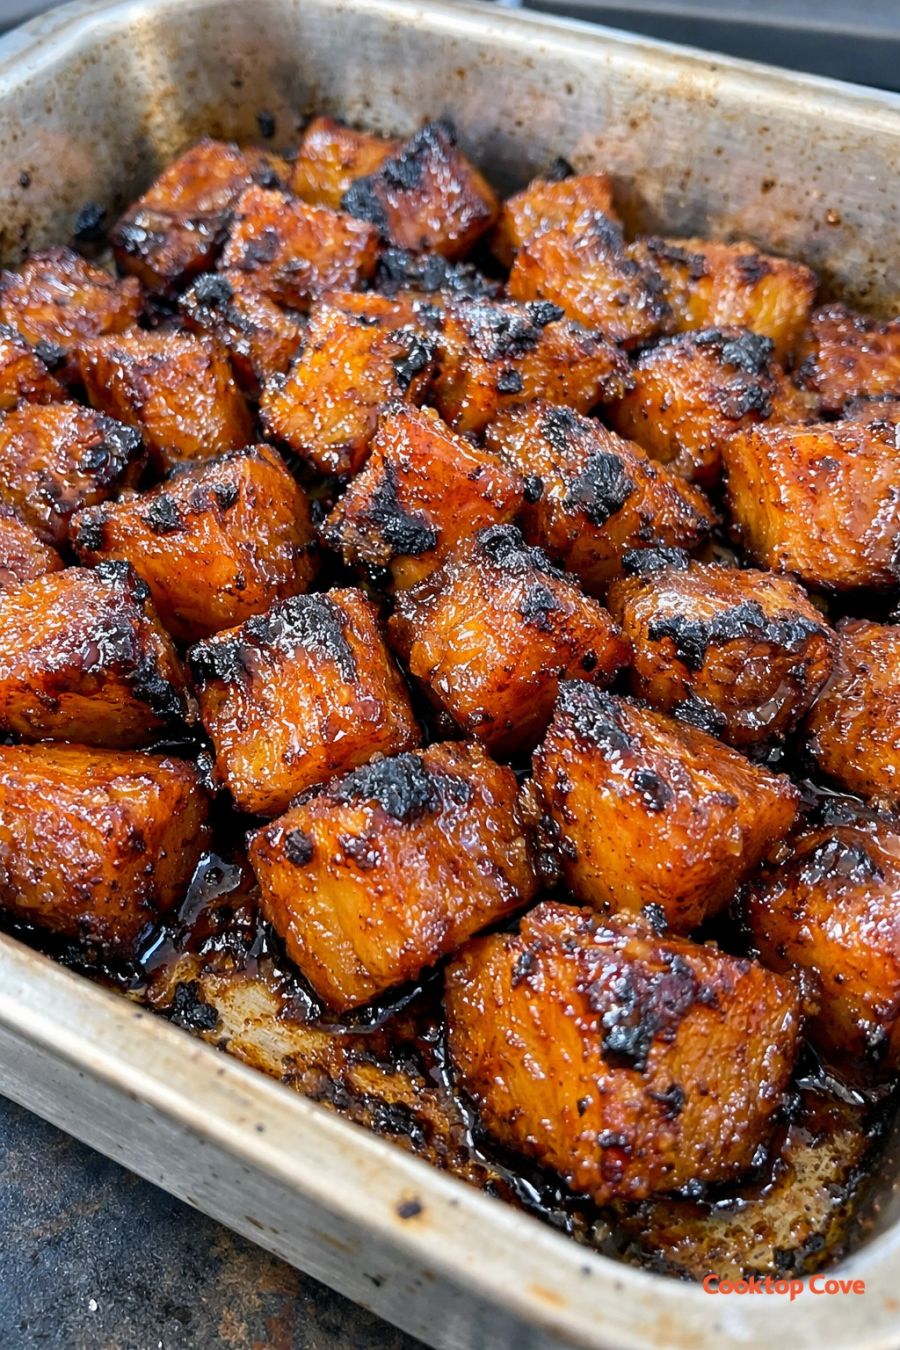
These 3-ingredient oven amber potatoes are my go-to side dish for Memorial Weekend when the grill is full and oven space is at a premium. They use just potatoes, a bottled sauce, and oil, but come out looking like you fussed over them for hours: deeply roasted, glossy amber cubes with crispy, slightly charred edges. I started making these on busy holiday weekends when I needed something hands-off that could share the oven with burgers or ribs, and they’ve stuck around because the kids and neighbors always ask for them.
Serve these glossy roasted potatoes alongside grilled burgers, brats, or chicken, and add a simple green salad or corn on the cob to round out the plate. They’re also great tucked into a bowl with leftover grilled meat and a spoonful of coleslaw for an easy next-day lunch. If you’re setting them out on a buffet, keep them right in the metal roasting pan so they stay warm and cozy, and let folks spoon them over baked beans or dip them in extra barbecue sauce or ranch.
3-Ingredient Oven Amber PotatoesServings: 4
Ingredients
2 pounds russet potatoes, peeled and cut into 1-inch cubes
1/3 cup thick, sweet barbecue sauce (your favorite brand)
2 tablespoons neutral oil (such as vegetable or canola oil)
Directions
Preheat your oven to 425°F (220°C). Place a metal roasting pan or rimmed baking sheet in the oven while it heats so the pan gets hot; this helps the potatoes start crisping right away.
Peel the russet potatoes and cut them into even 1-inch cubes. Try to keep the pieces similar in size so they roast at the same pace.
In a large bowl, toss the potato cubes with the neutral oil until every piece is lightly coated. This keeps them from sticking and helps them brown.
Carefully remove the hot pan from the oven and quickly spread the oiled potatoes out in a single layer. Give them space so they roast instead of steam.
Roast the potatoes for 20 minutes, then take the pan out and gently flip the cubes with a spatula to expose new sides. Return to the oven and roast for another 10–15 minutes, until the potatoes are tender inside and the edges are starting to brown and crisp.
While the potatoes finish roasting, pour the barbecue sauce into a small bowl so it’s ready. You want a sauce that’s on the thicker, sweeter side for a glossy amber finish.
When the potatoes are tender and nicely browned, remove the pan from the oven. Immediately drizzle the barbecue sauce over the hot potatoes and toss right in the pan until every cube is coated in a shiny glaze.
Return the glazed potatoes to the oven for 5–8 minutes, just until the sauce bubbles, thickens slightly, and clings in a glossy amber layer with a few charred spots on the edges.
Take the pan out and let the potatoes sit for 3–5 minutes; the glaze will set and become even shinier as it cools slightly. Serve straight from the metal roasting pan while hot.
Variations & Tips
For picky eaters, you can use a milder, sweeter barbecue sauce or even a honey-style barbecue so there’s no heat. If you prefer less sweetness, mix half barbecue sauce and half tomato sauce or ketchup before tossing with the potatoes. For a smoky twist, pick a smoky hickory or mesquite barbecue sauce; for a tangier version, use a vinegar-forward sauce and add a teaspoon of brown sugar to keep the glossy finish. If your family likes extra char, leave the potatoes in for an extra 2–3 minutes at the end, watching closely so the glaze doesn’t burn. You can also cut the potatoes slightly smaller (3/4-inch cubes) for kids who like crispier bites, but start checking for doneness a few minutes earlier. Food safety tips: Wash and peel potatoes on a clean cutting board and use a sharp knife for safe, even cuts. Keep raw potatoes and any other raw foods (like meat you might be prepping for the grill) on separate boards to avoid cross-contamination. Don’t leave the finished potatoes at room temperature for more than 2 hours; if you’re serving outside on a warm Memorial weekend, keep them shaded and bring leftovers inside promptly. Reheat leftovers in a hot oven (around 400°F/200°C) until steaming hot all the way through to maintain a safe temperature and restore their crisp edges.