This 4-ingredient oven caramelized cluster dessert is my secret weapon for holidays like Mother’s Day, or honestly any night when I want dessert handled hours ahead. It bakes up into a chewy golden base with bubbling amber caramel and crunchy little clusters all over the top—think of it as a cross between a cookie bar and a pan of roasted caramel corn. The whole thing happens in one metal baking pan, goes straight into the oven, and then just hangs out on the counter until you’re ready to slice and serve. No mixer, no candy thermometer, and no last-minute fuss when guests are already in the driveway.
Serve these caramelized clusters at room temperature, sliced into bars or broken into rustic shards right from the metal pan. They’re lovely on their own with coffee or tea, but feel extra special with a scoop of vanilla ice cream or a dollop of whipped cream that melts into all the caramel pockets. For a make-ahead dessert tray, pair them with fresh berries or sliced strawberries for a little brightness. If you’re serving a bigger crowd, set the pan out family-style so everyone can break off their favorite chewy–crunchy corner piece.
4-Ingredient Caramelized Cluster Bars
Servings: 12
Ingredients
1 1/4 cups packed light brown sugar
1 cup (2 sticks) unsalted butter, melted and slightly cooled
2 cups old-fashioned rolled oats
1 1/4 cups all-purpose flour
Directions
Heat the oven to 350°F (175°C). Line a metal 9x13-inch baking pan with parchment paper, leaving a little overhang on the long sides for easy lifting later. Lightly grease the parchment and any exposed sides of the pan.
In a large mixing bowl, whisk together the melted butter and brown sugar until the mixture looks glossy and evenly combined, about 30 to 60 seconds. This is your simple caramel base that will bubble and turn amber in the oven.
Add the all-purpose flour and rolled oats to the bowl. Stir with a spatula or wooden spoon until everything is evenly moistened and there are no dry streaks of flour. The mixture will be thick and a bit sandy but should hold together when pressed with your fingers.
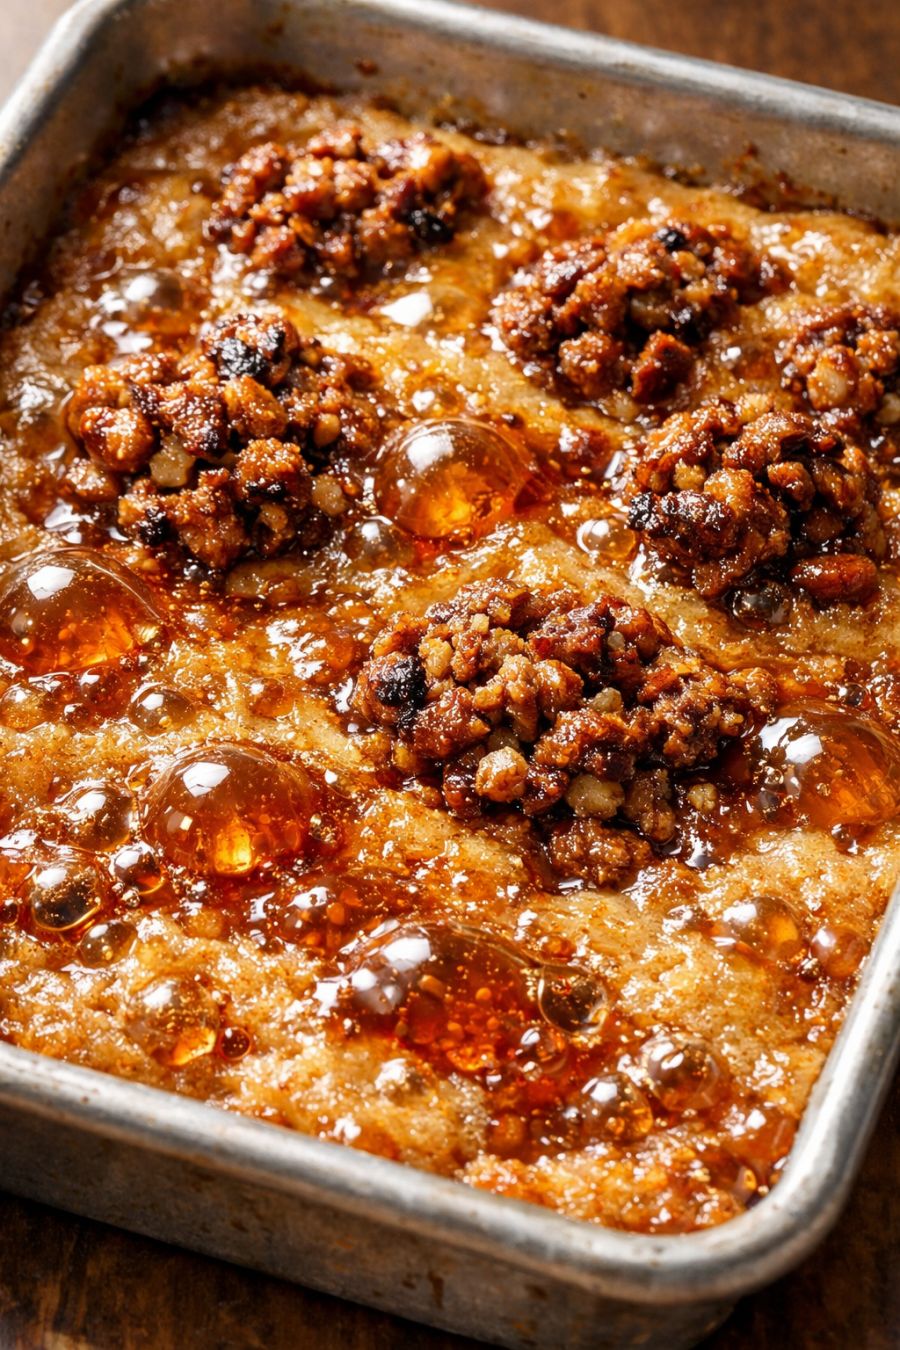
Transfer the mixture to the prepared metal pan. Use your hands or the back of a spoon to press it firmly and evenly into the pan, making sure to get into the corners. For those caramelized clusters, don’t worry about making the top perfectly smooth—leave it a little bumpy and uneven so the oats can toast and form crunchy bits.
Bake on the middle rack for 22 to 28 minutes, or until the edges are deeply golden, the top is a rich amber color, and you can see tiny bubbling caramel-like puddles around some of the oat clusters. The center should look set but still slightly soft; it will firm up as it cools.
Remove the pan from the oven and place it on a wire rack. Let the dessert cool completely in the pan, at least 1 1/2 to 2 hours, so the base can set into a chewy, sliceable texture and the caramelized clusters crisp up. This is when you can walk away and let dessert be “handled” while you do everything else.
Once fully cool, use the parchment overhang to lift the slab out of the pan onto a cutting board. Slice into bars, squares, or break into rustic clusters along the natural cracks and crunchy pockets. Store any leftovers in an airtight container at room temperature for up to 3 days.
Variations & Tips
To dress this up without adding more ingredients, you can play with texture and shape: press the mixture more firmly for a denser, chewier bar, or leave the surface extra craggy so more oats are exposed and turn into crisp, caramelized clusters. If you’re not strictly sticking to four ingredients, a pinch of salt and a splash of vanilla stirred into the butter–sugar mixture add a cozy bakery-style flavor, and a small handful of chopped nuts or chocolate chips pressed lightly on top before baking will give you extra pockets of crunch or melt. For a slightly less sweet version, you can reduce the brown sugar to 1 cup; the bars will still caramelize, just a bit more gently. To make ahead, bake in the morning, cool completely, then cover the pan tightly with foil until serving—this keeps the chewy base soft while preserving the crunchy edges. Food safety tips: let the bars cool on a stable, heat-safe surface and keep them away from the edge of the counter, especially if you have kids or pets. Because this dessert is low in moisture and fully baked, it is safe at room temperature for several days; avoid storing it in a very warm or humid spot, which can make the caramelized top sticky. Always check that your butter is fresh and that the bars are baked until the edges are well set to avoid any underbaked, greasy center.
